
Looking for sheer audio bliss? Learning how to calibrate your home theater receiver or home theater speakers can take your audio experience to the next level.
Here’s why home theatre calibration can be an absolute game changer!
Today, even the most basic home theater speakers come with auto-setup features. Nevertheless, if you're looking for the very best sound quality, it’s important to know that these auto-setups don't always deliver what you want.
Suffice to say that the step of home theater audio calibration is most significant, as failing this will lead to speakers delivering a sub-par performance.
Even if you are a home theater enthusiast, it’s easy to feel daunted by the task of home theatre calibration. With few tools and some guidance, even the most electronically-challenged can get the most superior sound quality by performing a manual speaker setup.
Here’s our quick and easy guide to home theatre audio calibration:
Step 1: Make Sure You Can See Your Receiver’s Display On Your TV
Most modern receivers will put out the on-screen display via HDMI, but some older receivers require an old-school video connection. Look for the menu pop up on your TV when you press the “menu” or “setup” button on your receiver’s remote, else make sure you have at least an RCA cable handy for connecting the receiver’s composite video (yellow RCA jack) output to your TV’s composite video input.
Step 2: Get To Know Your Receiver’s Menu Better
Getting hands-on experience with your receiver's menu by going through it with your remote provides a huge number of benefits. Most importantly, after a while, you’ll find that you remember where a lot of the menu options are because you have navigated there several times before.
Also Read: Understanding AV receivers: A buying guide to help you choose one
Step 3: Follow the Basic Speaker Placement Rules
The room in which your speakers live can dictate where the speakers must be placed, and placement can also vary based on the types of speakers you’re using. Some of us have entertainment centres with a fixed place in mind for the speakers, or we only have a few options of open spots in which to place a speaker.
For the best possible outcome from sound system calibration, try to follow the basic speaker placement rules.
- The centre channel should be placed directly below or above your television. Since dialogues come from this speaker, it needs to be very close to the TV to maintain the illusion that the voices are coming from the picture itself.
- It would be helpful to place your left and right speakers far away from each other as your central listening position is from your TV, creating an equilateral triangle between your head and the two speakers.
- Usually, the central listening position is the seat located directly in front of the TV. If this doesn’t apply, then select the spot in the room where most of the listening will be done. You can also place the top of the speaker at about 40 inches off the floor that is the average ear height.
- Place your surround speakers above ear level between 48 inches and 72 inches and just behind your listening position. If you have surround back speakers (the sixth and seventh channels), mirror them in the same positions as the front speakers, on the wall behind you.
- If you’re adding Dolby Atmos/DTS:X speakers (i.e. height speakers for 3D/object-based surround setups), it’s recommended to position upward-firing speakers directly on top of each of the front left and right speakers and, if you’re adding back height speakers, place them directly on top of the left and right surrounds. Alternatively, Dolby recommends you make sure they’re within three feet of those speakers at the front and back respectively. Also, assure the speakers are at or slightly above ear level.
- If the speakers are wall-mounted they can be higher, but only up to half the height of your wall. If you’re mounting them in the ceiling, Dolby recommends the ideal height as between 7.5 and 12 feet, with 14 feet, tops. If you’re only adding two ceiling-mounted speakers, they should be mounted directly above the central listening position at an angle of around 80 degrees from the top of your head.
- Avoid placing the subwoofer within another cabinet like an entertainment center. Subwoofers sound best placed a third of the way into the room from the side and front (or back) wall. You can place a subwoofer in the back of the room, but make sure it is at least 3 feet away from your head. Atleast, make sure to keep at least 1 foot of distance between the sub and any given wall.
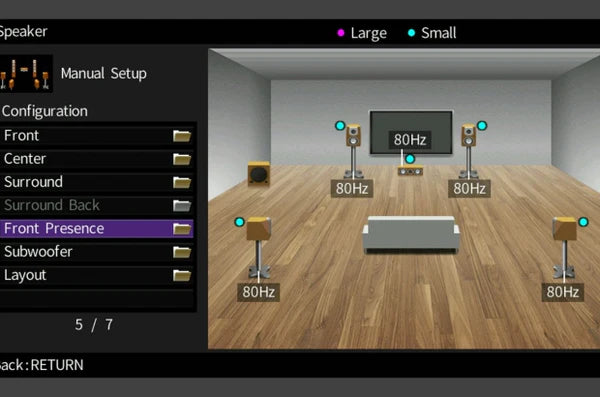
- To set up your receiver, first access your receiver’s menu and select the “speaker set-up” option. Most receivers offer the same basic adjustments like speaker distance, speaker size and crossover setting, and speaker level.
- The distance between each speaker and your central listening position is commonly referred to as speaker distance. Measure the distance from the front of each speaker directly to where your head resides when seated in the central listening spot, then jot each measurement down on your notepad. Once all the measurements are made, add them into the receiver. The receiver will prompt you, speaker by speaker, to input a distance measurement in increments of feet, half-feet or even down to 1/12 of a foot.
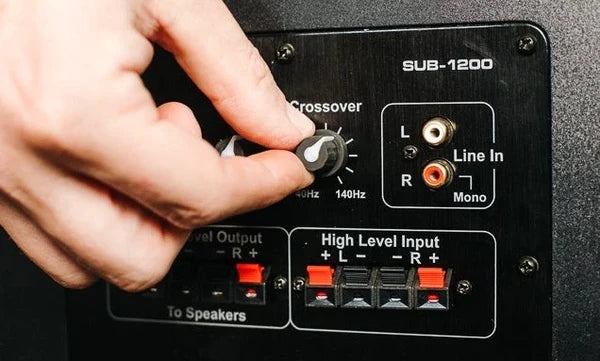
- “Crossover” refers to the point at which your receiver stops sending bass to each of your speakers and begins sending it to your subwoofer. The correct crossover setting will depend on your speakers’ ability to produce bass.
- Most speaker manufacturers provide specs that indicate where your speakers stop producing bass, but often the bass is much weaker as its lowest-rated point than it is in the rest of its performance range. So, you may want to move the number up by 20Hz or so to be on the safe side.
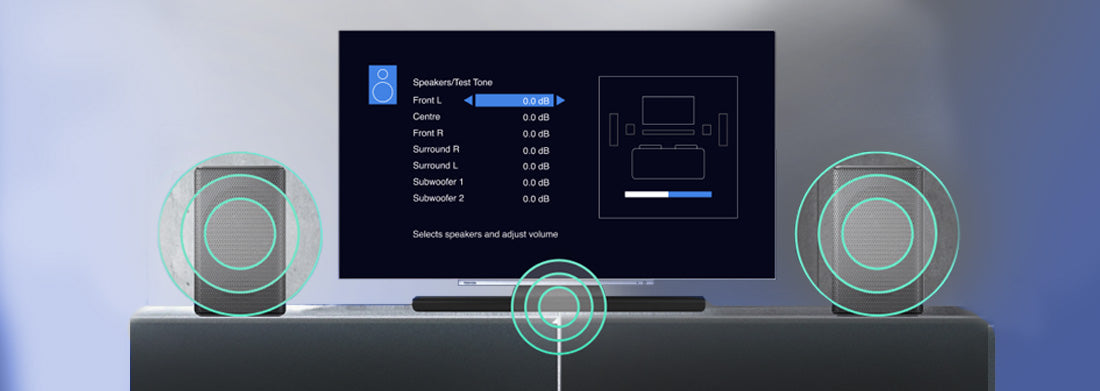
Step 4: Calibrate the Speaker Level
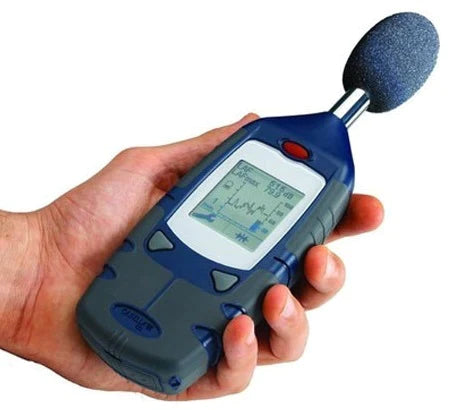
To effectively complete the process of home theater speaker calibration, it is crucial that you balance the volume level of each speaker relative to your seating position, so you hear each speaker at the proper level regardless of how far or close each speaker may be. Using a decibel metre will get you more precise results.
When you aren’t using it to calibrate your speaker system, you can use it to make sure you aren’t violating your city’s noise ordinance when playing out your music loud. If you want to hear each speaker at the proper level, use a decibel metre to get the most accurate outcome.
You can find them online or download apps for both Android and iOS devices. Be seated in your central listening position, turn on the metre and set the dial to 70 dB. Set the weighting to “C” and the response to “slow.”
Hold the metre facing you directly with the microphone end pointed at the ceiling. You can select any level of your choice. The popular levels are 70, 75 and 80 DB.
Also Read: Complete Guide To Home Theater Sound Calibration For A Fantastic Sound
Step 5: Time to Work on Your Settings
Then, proceed with the test tone and adjust the subwoofer level output such that the sub just begins to shake the room.
Test your subwoofer settings by using a piece of music or a movie that you are familiar with. If while listening to the music or movie of your choice you find you desire less or more bass, go back into the speaker level portion of your menu and recalibrate.
The final word on home theatre calibration
Finally, sit back and enjoy the most balanced, and natural sounding performance of your speaker system and receiver with the satisfaction of knowing that you aced the audio and home theatre calibration.Hopefully, our guide on speaker level calibration and other related aspects has some useful tips for you. Alongside, we would be happy to help you achieve the best outcome from your home theatre system.


